In the world of sweet treats and nostalgic desserts, there’s one that stands out in the memories of many: Grandma’s old-fashioned apple pie. This article is a journey back in time, to the kitchen of our grandmothers where the aroma of baking apples and cinnamon filled the air, promising a slice of warm, comforting delight. Beyond just a recipe, this is a tale of tradition, of family gatherings, and of the simple yet profound joy that a well-made apple pie can bring into our lives. As we delve into the secrets of making the perfect traditional apple pie, we’ll explore the history, the techniques, and the variations that have made this dessert a timeless classic.
Introduction to Grandma’s Old-Fashioned Apple Pie
Ah, the classic homemade apple pie – it’s more than just a dessert; it’s a hug from the past, a piece of heritage sitting prettily on your dinner table. Who among us doesn’t hold dear those moments spent in the warmth of Grandma’s kitchen, eagerly watching as she expertly crafted her famous pie? The truth is, recipes like Grandma’s old-fashioned apple pie carry with them stories, traditions, and the essence of home cooking at its finest.
In today’s fast-paced world, where pre-packaged foods and quick fixes are the norms, taking the time to recreate such a beloved recipe is not just an act of cooking but one of preserving a slice of history. It’s about rekindling those warm, fuzzy feelings of nostalgia and sharing them with the next generation. So, whether you’re a seasoned baker or a novice eager to try your hand at this culinary masterpiece, this guide is your doorway to mastering the art of the perfect heirloom apple pie method.
By the end of this article, you’ll not only be equipped with the knowledge to bake a pie that would make Grandma proud, but you’ll also understand the significance of each ingredient and step in the process. Moreover, you’ll learn how these elements combine to create something that’s much more than just a tasty treat – a testament to the love and care that goes into vintage apple pie cooking tips.
So, let’s roll up our sleeves, flour our rolling pins, and get ready to embark on a delicious journey back to the basics of baking, where every ingredient tells a story, and every bite takes you home. Let the adventure begin!
The Story Behind the Recipe
Every family has its treasure trove of recipes that have been passed down through generations, and the traditional apple pie recipe often holds a place of honor. But have you ever wondered where this beloved dessert began its journey? Or why Grandma’s old-fashioned apple pie has such a special place in our hearts and on our dinner tables?
The Roots of Tradition
The apple pie, a symbol of American prosperity and patriotism, actually has its roots deeply embedded in European history. Brought to the New World by the early settlers, the basic concept of apple pie was transformed using the ingredients available in their new homeland. Over time, it evolved into the classic homemade apple pie we adore today.
Yet, it’s not just the recipe that’s been handed down; it’s the love and care with which it’s made. Each slice of heirloom apple pie is a reminder of the hands that kneaded the dough and the smiles that followed a bite of the warm, spiced apple filling. It’s a connection to our past, to the people we hold dear, and to the simple pleasures that make life sweet.
Preserving a Legacy
In a world where change is the only constant, the act of baking Grandma’s old-fashioned apple pie is a powerful link to the past. It’s more than just following a recipe; it’s about keeping a legacy alive. Each time we preheat our ovens and start peeling apples, we’re not just preparing a dessert; we’re reviving memories and ensuring that the future can taste the sweetness of the past.
Interestingly, the variations in apple pie recipes from one family to another speak volumes about the diversity of culinary traditions. Whether your grandma used tart Granny Smith apples or swore by the sweetness of Golden Delicious, the essence of the pie remained the same—a celebration of family, love, and the joy of sharing.
To learn more about the diverse world of apples and their uses in baking, consider exploring the National Apple Harvest Festival, which offers a deep dive into apple varieties and their culinary applications.
The Ingredient of Love
Perhaps the most crucial ingredient in Grandma’s old-fashioned apple pie isn’t something you can buy at the store. It’s love. The time and effort put into baking from scratch, the passed-down tips and tricks, the patience in waiting for the pie to bake to golden perfection—all these are expressions of love. And maybe, that’s the real secret behind why this pie tastes so divine.
So, as we continue our journey into the art of pie-making, remember, it’s not just about the perfect crust or the juiciest filling; it’s about the stories, the heritage, and the love that each pie represents. Let’s carry forward this tradition with pride and ensure that Grandma’s old-fashioned apple pie continues to bring joy and warmth to tables for generations to come.

Ingredients and Preparations
Embarking on the adventure of crafting Grandma’s old-fashioned apple pie begins with gathering the right ingredients. Just like any timeless tale, the magic is in the details—or in this case, the quality and choice of ingredients. Here’s how to start your pie-making journey with confidence and a touch of nostalgia.
Ingredients List
A successful traditional apple pie recipe starts with simplicity and authenticity in the ingredients. You’ll need:
- Apples: The soul of the pie. Opt for a mix of tart and sweet varieties for a balanced flavor. Granny Smith and Honeycrisp make a delightful combination.
- Sugar: A mix of white and brown sugar sweetens the filling beautifully, adding depth.
- Cinnamon and Nutmeg: These spices are the heart of the pie’s warming flavor.
- Butter: For that rich, flaky crust, unsalted butter is a must.
- Flour: A key ingredient for both the crust and to thicken the filling.
- Lemon Juice: Just a dash to brighten the apple filling and prevent browning.
- Salt: A pinch to enhance all the flavors.
- Ice Water: Essential for bringing the pie dough together without overworking it.
This list, while simple, is the foundation of creating a pie that tastes like it’s straight out of Grandma’s kitchen.
Preparing the Apples
Choosing and preparing the apples is a task that requires thought and care. The variety of apple you select can significantly impact the texture and taste of your pie. For a pie that’s both sweet and tangy, consider a mix of apples. Peeling and slicing them uniformly ensures even cooking and a perfect filling texture.
- Selecting the Right Apples: Aim for a blend of tart and sweet. Visit local farmers’ markets for the freshest picks.
- Preparation Tips: Peel the apples to avoid tough bits in the filling. Slice them thinly and evenly for a filling that’s tender yet holds together.
By handling these initial steps with attention and love, you’re setting the stage for a pie that encapsulates the essence of home cooking and the rich tapestry of flavors that define Grandma’s old-fashioned apple pie. The act of peeling, slicing, and mixing becomes a meditative process, connecting us to the generations of pie makers before us. It’s in these moments that we truly appreciate the timeless beauty of this simple dessert.
As we dive deeper into the intricacies of pie-making, remember that each step, from selecting the best apples to mixing the dough, is an opportunity to pour love and care into something that will bring joy to those we share it with. Stay tuned as we next tackle the art of creating the perfect pie crust, a crucial element in our pie-making journey.
Making the Pie
After meticulously selecting our ingredients and preparing our apples with love, we’re now ready to dive into the heart of pie-making: crafting the perfect crust and filling. This stage is where patience, precision, and passion come into play, transforming simple ingredients into a masterpiece of flavors and textures.
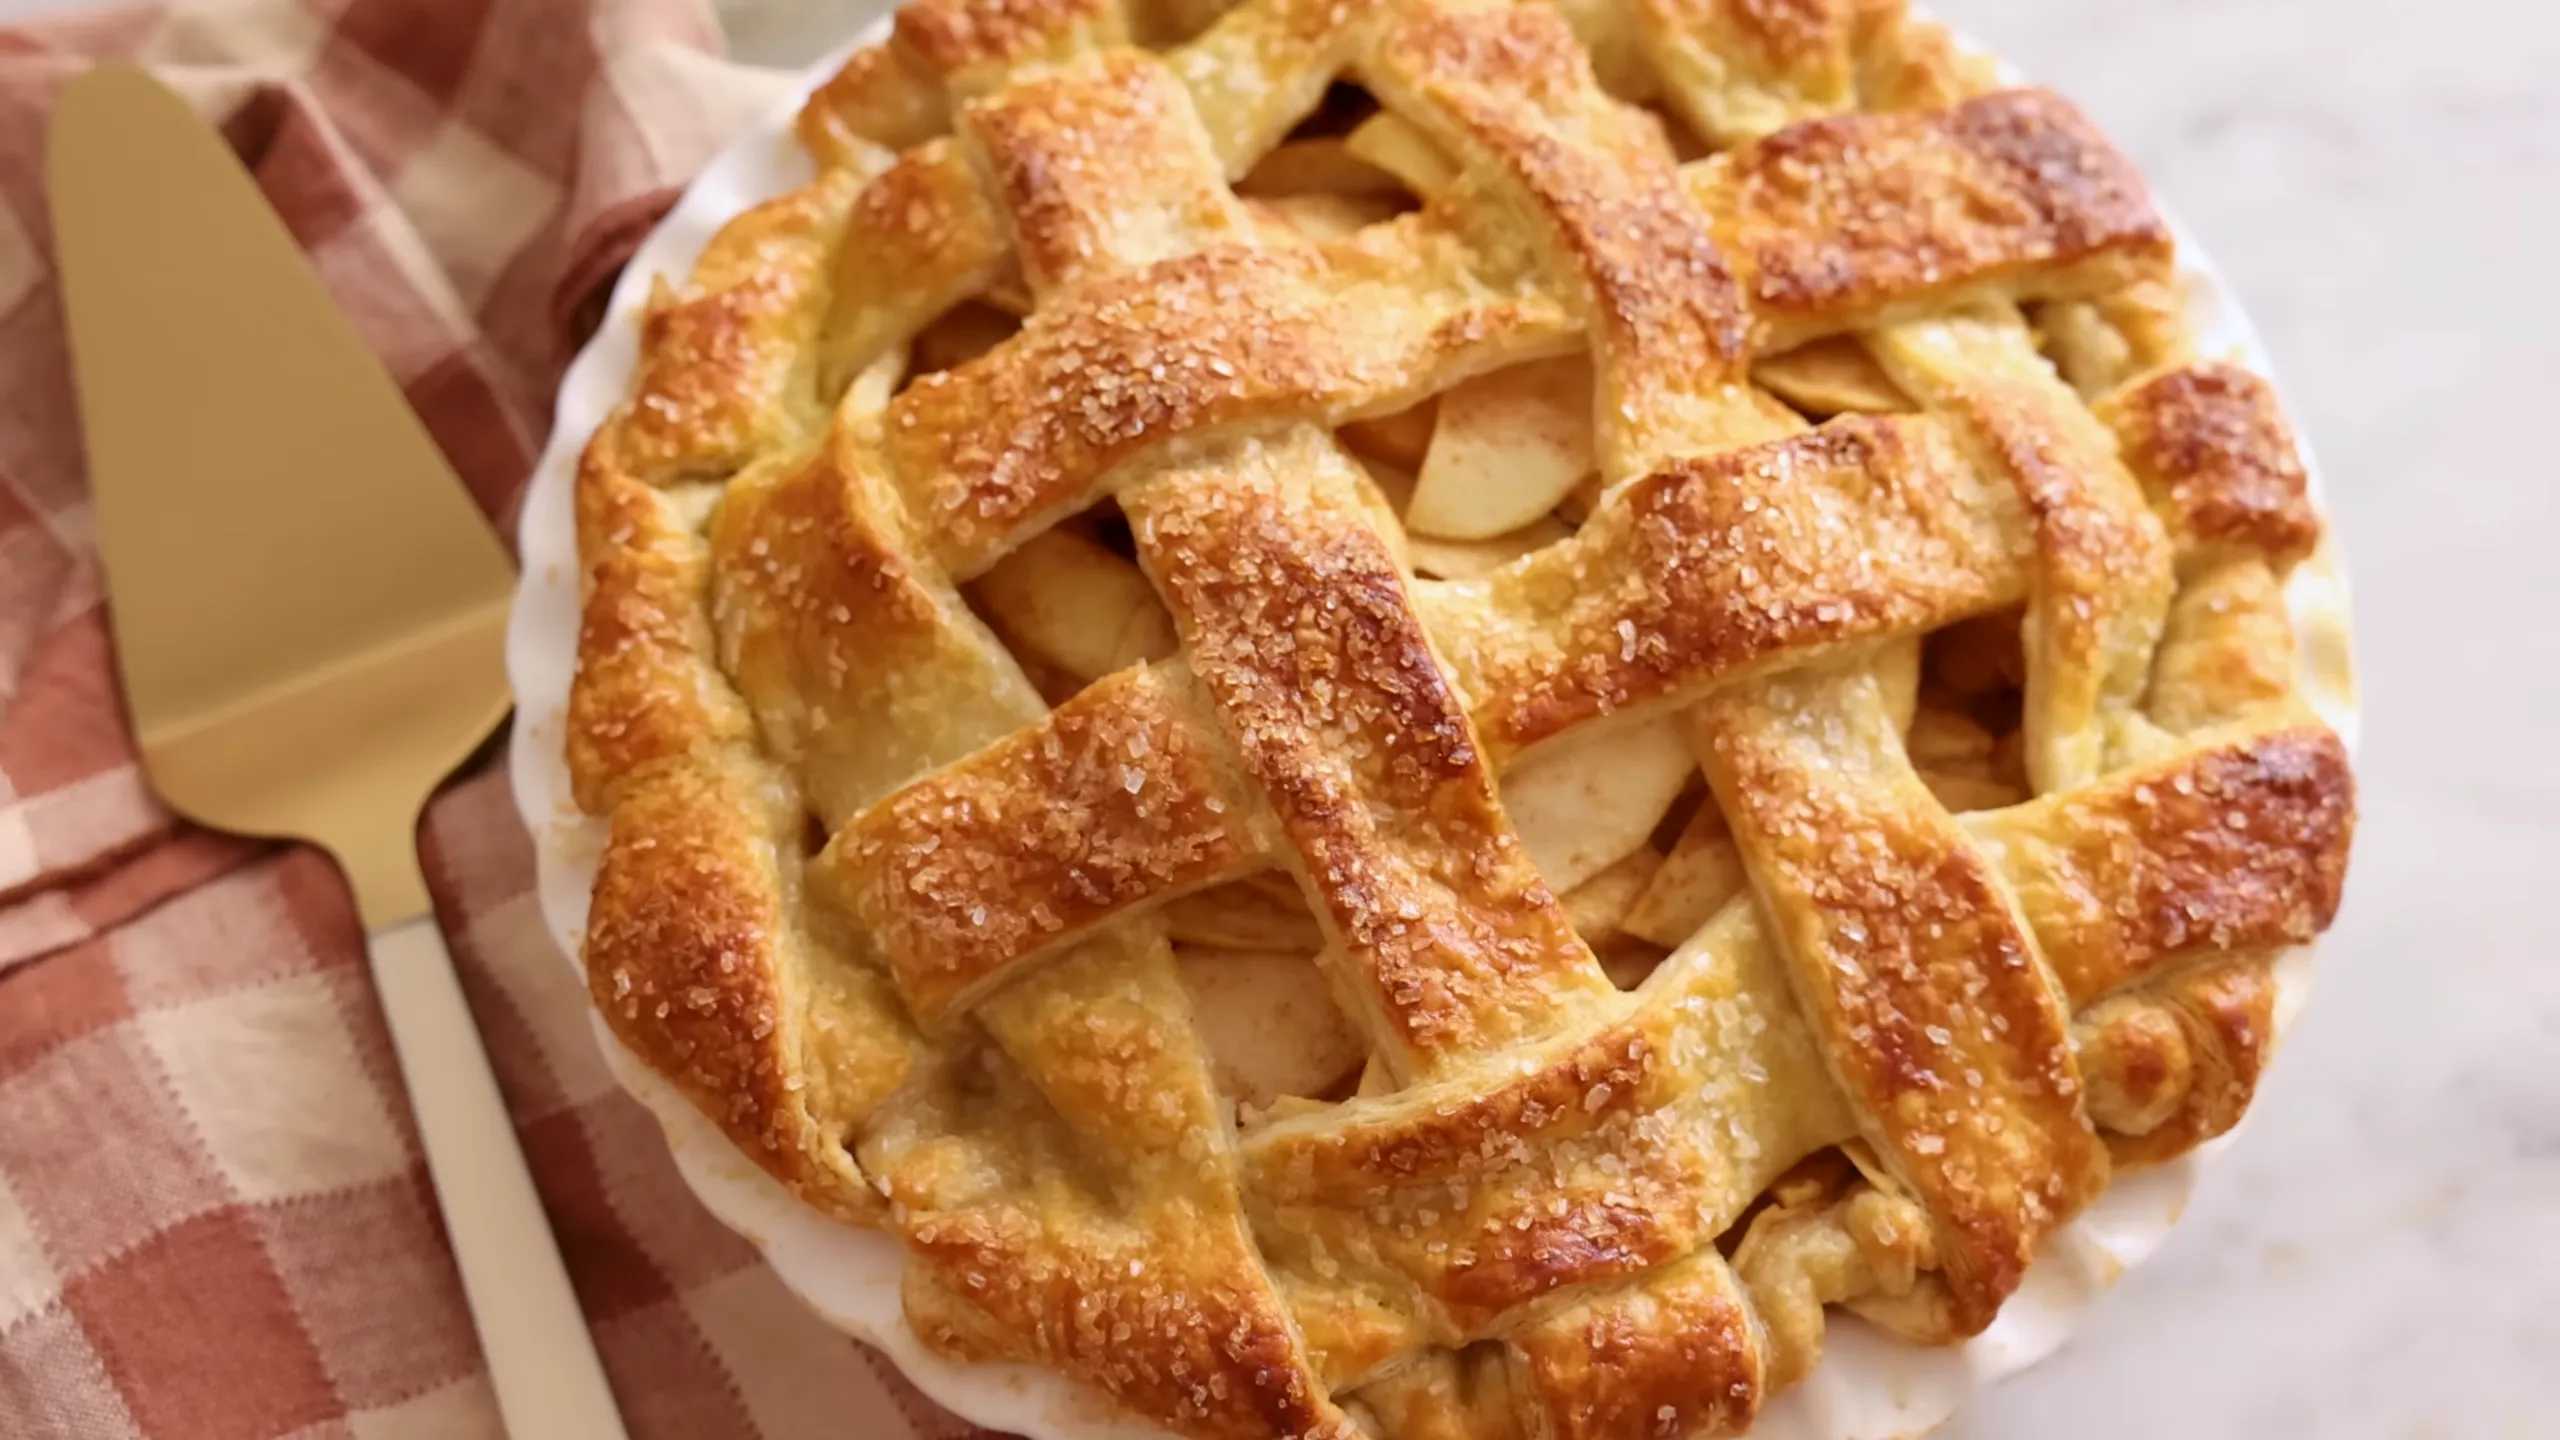
The Crust
The crust is the foundation of any great pie, especially when it comes to Grandma’s old-fashioned apple pie. Achieving that flaky, buttery perfection requires a blend of the right technique and the best ingredients.
- Ingredients for a Flaky Crust: Start with cold, unsalted butter cut into small cubes. The cold butter is key to achieving those delightful, flaky layers. Combine with flour, a pinch of salt, and just enough ice water to bring the dough together.
- Step-by-Step Guide: Begin by incorporating the butter into the flour using a pastry cutter or your fingertips, working quickly to keep the mixture cold. Once the mixture resembles coarse crumbs, gradually add ice water, mixing until the dough just comes together. Chill the dough before rolling it out to ensure it’s easy to handle and retains its shape during baking.
Handling the dough with care and not overworking it is crucial. The goal is a crust that’s tender, flaky, and golden brown—a perfect canvas for the rich, spiced apple filling.
The Filling
The filling, rich with spiced apples, is the soul of the pie. Here, the flavors of autumn—cinnamon, nutmeg, and apple—meld together in a sweet, tangy embrace that defines classic homemade apple pie.
- Mixing the Filling: Toss your thinly sliced apples with sugar, cinnamon, nutmeg, a bit of flour to thicken, and a splash of lemon juice to brighten the flavors and prevent browning. This mixture should be juicy but not overly wet to prevent a soggy bottom crust.
- Secret Ingredients: For an added depth of flavor, consider a sprinkle of ground cloves or a dash of vanilla extract. These subtle additions can enhance the filling, giving it that special ‘grandma’s touch’.
Assembling the pie is an act of love—a process of layering flavors and textures that come together in the oven to create a dessert that’s more than just a treat; it’s a piece of culinary art. Pour the apple mixture into the rolled-out crust, dot with butter, and cover with a top crust. Crimp the edges to seal in all the goodness, and don’t forget to cut slits in the top crust to allow steam to escape.
Baking the pie to golden perfection is the final step in this labor of love. As the pie bakes, the kitchen fills with the irresistible aroma of cooking apples and cinnamon, a scent that’s sure to bring back fond memories and create new ones.
In the next part of our journey, we’ll explore the baking process in more detail, ensuring that your Grandma’s old-fashioned apple pie comes out perfectly every time. Remember, the secret to a great pie lies not just in the ingredients or the technique, but in the love and care that goes into each step of the process.

Baking and Final Touches
After meticulously preparing the crust and filling for Grandma’s old-fashioned apple pie, we’ve arrived at a pivotal moment: baking. This stage is where the raw ingredients transform into a golden, aromatic masterpiece. Let’s dive into the final steps and learn how to give our pie the perfect finish.
Baking the Pie
The anticipation builds as you slide the pie into the oven. Here’s how to ensure that your pie bakes to perfection:
- Preheat the Oven: Consistent heat is key. Preheat your oven to 375°F (190°C) for an even bake.
- Positioning the Pie: Place the pie on the lower middle rack to promote even cooking. This position helps the bottom crust bake thoroughly while allowing the top to golden beautifully.
- Baking Time: Patience is your ally. Bake the pie for about 50-60 minutes. Look for a golden-brown crust and bubbling filling. If the edges brown too quickly, shield them with foil.
Baking is both an art and a science. By following these guidelines, you’re honoring the tradition of pie making, ensuring your traditional apple pie emerges as a testament to your dedication.
Serving Suggestions
A perfectly baked classic homemade apple pie deserves a presentation that complements its rich flavors and homey charm:
- Cooling: Allow the pie to cool on a wire rack for at least two hours. This step is crucial for the filling to set, ensuring clean slices.
- Serving: Serve the pie at room temperature or slightly warmed. A dollop of whipped cream or a scoop of vanilla ice cream on the side elevates the experience, blending creamy textures with the pie’s spiced warmth.
Linking Tradition and Taste
As we’ve journeyed through the process of creating Grandma’s old-fashioned apple pie, from selecting ingredients to the joy of baking, we’ve woven a tapestry of tradition, taste, and togetherness. This pie is more than a dessert; it’s a celebration of heritage, a nod to the simplicity of good, honest cooking, and a reminder of the bonds that food can forge among friends and family.
In every slice, we find the echoes of laughter, the warmth of shared stories, and the sweetness of memories made around the dining table. Grandma’s old-fashioned apple pie is not just a recipe; it’s a legacy of love, meant to be passed down through generations, just as it was shared with us.
So, as you place your pie on the table, remember that you’re not just serving a dessert—you’re sharing a piece of history, a slice of home, and a morsel of the love that binds us all. Here’s to creating new memories, one pie at a time.
In this journey of baking and sharing, may you find joy in the simple pleasures and the timeless taste of Grandma’s old-fashioned apple pie.
FAQs Section
Baking Grandma’s old-fashioned apple pie might seem like a journey back in time, but it comes with its own set of modern-day queries. Here are answers to some frequently asked questions that might arise as you embark on this delicious adventure.
How to Store and Reheat Apple Pie?
- Storing Your Pie: If you’re lucky enough to have leftovers, Grandma’s old-fashioned apple pie can be covered with aluminum foil or plastic wrap and stored at room temperature for up to two days. For longer storage, refrigerate it for up to four days.
- Reheating Tips: To revive that just-baked warmth and texture, reheat slices in a 350°F (175°C) oven for about 10 minutes or until warmed through. Avoid the microwave, as it can make the crust soggy.
Can the Apple Pie be Frozen?
Absolutely! Freezing apple pie is a great way to extend its shelf life and enjoy a slice of nostalgia on demand.
- Freezing: Cool the pie completely before freezing. Wrap it tightly in plastic wrap or aluminum foil, then place it in a heavy-duty freezer bag. It can be frozen for up to four months.
- Thawing and Reheating: Thaw the pie overnight in the refrigerator. Reheat in a 350°F (175°C) oven for about 25-30 minutes, or until warm.
Tips for Making the Pie Gluten-Free or Vegan?
- Gluten-Free Options: Substitute the all-purpose flour with your favorite gluten-free flour blend for both the crust and filling. Look for a blend that’s designed for pie crusts to ensure a flaky outcome.
- Vegan Variations: Use plant-based butter and shortening in the crust. For the filling, ensure your sugar is vegan (some sugars are processed with bone char), and opt for a plant-based butter alternative.

Pie Perfection for Everyone
Remember, the essence of making Grandma’s old-fashioned apple pie lies in the love and care poured into each step. Whether you’re tweaking the recipe to accommodate dietary preferences or storing leftovers for a rainy day treat, the goal is to enjoy the process and the delicious results.
So, go ahead, roll out that dough, fill your kitchen with the scent of baking apples, and relish in the joy of sharing this timeless dessert. After all, each slice of Grandma’s old-fashioned apple pie is a testament to the beauty of simple ingredients coming together to create something extraordinary.
And there you have it—the ins and outs of crafting and caring for your masterpiece. May these tips and tricks empower you to bake with confidence and enjoy the timeless delight of Grandma’s old-fashioned apple pie. Here’s to creating warm memories, one pie at a time!
Conclusion
As we wrap up our journey through the art of making Grandma’s old-fashioned apple pie, we reflect on more than just the steps and ingredients that go into creating this timeless dessert. We’ve delved into a tradition that transcends generations, a recipe that carries with it memories of family gatherings, holiday celebrations, and the simple yet profound joy of sharing a meal with loved ones.
Summary and Encouragement to Try the Recipe
From selecting the perfect blend of apples to mastering the flaky, buttery crust, every aspect of this classic homemade apple pie recipe is imbued with the essence of home cooking and the warmth of grandmotherly love. The spices that scent the air as the pie bakes, the golden crust that breaks perfectly under the fork, and the sweet-tart filling that sings of autumn—they all come together to create more than just a dessert. They create an experience, a moment to be shared and cherished.
This article has guided you through each step, hoping to inspire not just the creation of a pie but the revival of a tradition. In a world that often moves too fast, the act of baking Grandma’s old-fashioned apple pie is a reminder to slow down, to savor the simple pleasures, and to connect with our roots and with each other.
We encourage you to don your apron, roll out your dough, and fill your kitchen with the aroma of baking apples and cinnamon. Whether you’re continuing a family tradition or starting a new one, the act of making and sharing this pie is a celebration of all the warmth and love that cooking can bring into our lives.
Passing the Pie Forward
As you share this pie with family and friends, remember that you’re also sharing a story, a piece of history, and a labor of love. You’re contributing to a legacy that can be passed down through generations, each pie a symbol of connection, tradition, and the simple joy of a homemade dessert.
Grandma’s old-fashioned apple pie is more than a recipe—it’s a testament to the enduring power of food to bring us together, to create memories, and to add sweetness to our lives. May this pie be a reminder of the beauty of tradition and the timeless delight of sharing good food with good company.
Here’s to many more pies, many more shared moments, and the continued joy of baking from the heart. Thank you for joining us on this delicious journey. May your pies be flaky, your filling be sweet, and your kitchen be filled with love and laughter. Happy baking!